Taking high quality photographs of your artworks is a hugely important part of successfully selling your pieces online. Without a physical showroom to display your artwork, it is vital that you give your customers the best insight as possible through the images you upload to your site or your submission if its for a competition/exhibition. Whether or not you have photography experience, there are a few simple things you can do to ensure your images are as faithful as possible to life. Here are some basic starter tips to help you take photographs of your artwork that will do them justice.
Before diving into the process of capturing digital photographs of your artwork, let's talk about the essential equipment and tools you'll need. Here's a list of items that will help you achieve professional-looking results:
A digital camera or a phone with a good camera! - These days it's not entirely necessary to have a digital camera, ideal if you do of course, but smart phones can do a pretty fine back job to digital cameras.
Lighting Equipment - Proper lighting is crucial for capturing the colours, textures, and details of your artwork. Consider investing in a lighting setup, including softboxes, diffusers, and adjustable light stands. Natural light can also work well if you have a well-lit space to shoot in. You can browse our range of Daylight products here to find a solution to any lighting issues you may be having.
Backdrop and Stand - A neutral-colored backdrop, such as a white or gray backdrop, can help your artwork stand out. Use a backdrop stand or hang the backdrop securely to ensure a clean and professional-looking background.
Now that you have the necessary equipment and tools, let's move on to setting up the perfect environment for photographing artwork.
Creating a suitable environment for photographing artwork is essential to ensure accurate colour reproduction and minimize distractions. Here are some key considerations:
Choose a Well-Lit Space - Natural light is the ideal choice for capturing the true colours of your artwork. Look for a room with large windows or set up your shooting area near a well-lit window. Avoid direct sunlight, as it can create harsh shadows and affect colour accuracy. If natural light is not available or consistent, invest in artificial lighting equipment.
Eliminate Glare and Reflections - Position your artwork in such a way that it is not affected by any glare or reflections. This can be achieved by angling the artwork correctly and using polarizing filters on your camera lens or lighting equipment.
Clean and Prepare Your Artwork - Before photographing your artwork, ensure it is clean and free from any dust, smudges, or fingerprints. Use a soft brush or cloth to remove any debris. Additionally, consider framing your artwork if it enhances its presentation.
It's quite often artwork for entries is photographed leaned up against a wall and shot from an awkward angle. It is best practice to find neutral-coloured wall (white, grey or black) and hang your work at a height where the middle of your piece will be parallel to where your camera will be—either on a tripod or resting sturdily on a table or other surface.

Natural lighting is best, a room with large windows or a spot outside on a slightly overcast day will work well. If you cannot find a space with enough natural light, it is best to use two artificial lamps of the same intensity.
Soft, diffused lighting helps eliminate harsh shadows and evenly illuminates your artwork. Use softboxes or diffusers to soften the light source, creating a gentle and even distribution of light.
These lights should be positioned behind the spot from which you are taking your photographs. To achieve even coverage, each should ideally face the centre of the painting at a 45 degree angle.
Manual Mode - Switch your camera to manual mode to have full control over the exposure, aperture, and ISO settings. This allows you to fine-tune the settings to match the lighting conditions and desired outcome.
ISO - Set your camera's ISO to the lowest value possible (e.g., ISO 100 or 200) to minimize digital noise and ensure optimal image quality.
Aperture - Adjust the aperture to achieve the desired depth of field. A smaller aperture (higher f-number) results in a larger depth of field, keeping more of your artwork in focus. However, be mindful of diffraction, which can impact the sharpness of your images at very small apertures.
Shutter Speed - Use a tripod to enable longer exposure times without introducing a camera shake. This can be particularly useful when photographing highly detailed or intricate artwork. If you're using a smart phone, you can get great mini tripods, which are really helpful and help without that shakey hand.
White Balance - Set the white balance on your camera to match the lighting conditions. This helps ensure accurate colour reproduction in your photographs.
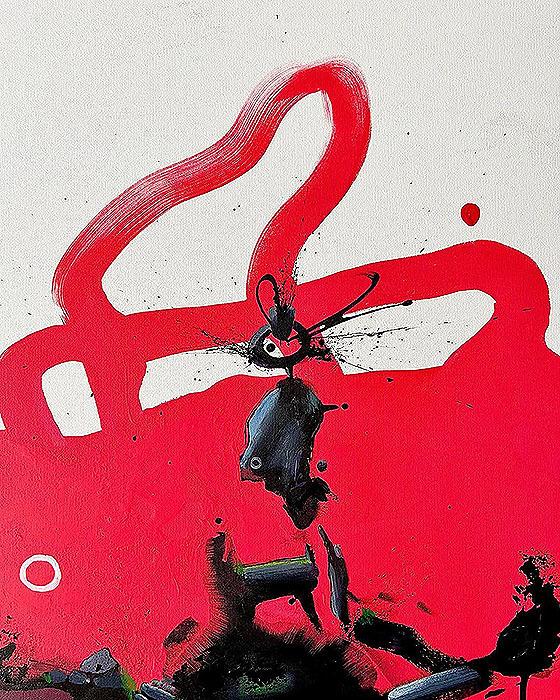
TIP - Be aware of ISO
This image of my painting 'Bullan', has been taken with a camera set to a high ISO - As you can see the colours appear pretty distorted and really quite grainy.
Benefit of good lighting
This image has been taken with a flash in a space with insufficient lighting. This has led to blurring and distortion in the centre, coupled with darkness around the edges of the canvas.
Check for any other settings that may distort a clear and natural representation of your artwork. If your camera has a date stamp functionality, make sure that it is turned off!

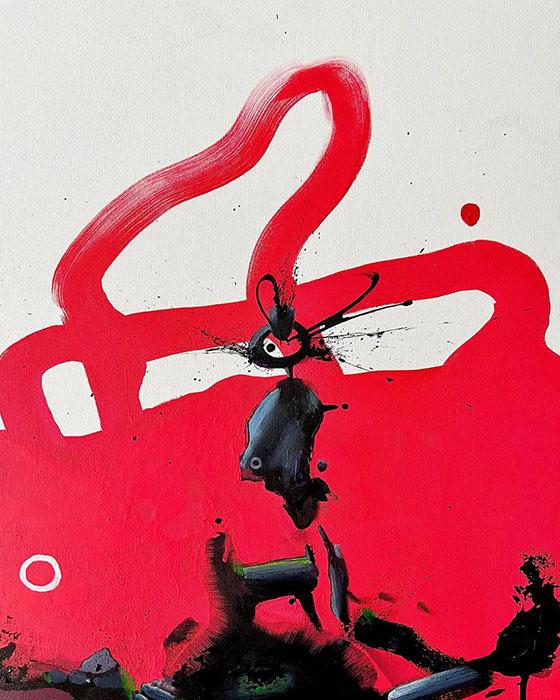
Ensure the flash is off!
As mentioned previously, be sure to turn off your flash before you start shooting - leaving it on could lead to misleading and washed-out colouring on your images. It can also block out certain areas of your work with a large bright flash! Also much more accurate representation is given by the photograph below, which was taken with an ISO setting of 100.
In an ideal world, the best-case scenario is that the only editing required is to crop the image. However, sometimes the lighting is a little off or the colours don’t quite match the original artwork, in which case doing a bit of editing can help. I use Adobe Photoshop and Lightroom for this, but there are many different photo editors (even free ones online) that will give you basic editing controls. I won’t go too in depth, but here are some basics that you will want to consider:
- Crop and keep an eye out for shadows, or anything else that shouldn’t be in the image.
- Try and adjust the brightness, contrast, and vibrancy to accurately match the original
- Shooting in raw format gives you greater editing options
In the digital age, high-quality digital photographs play a vital role in showcasing artwork to a global audience. By following the tips and techniques outlined, you can elevate your digital photography skills and showcase your work in the best possible fashion. From setting up the perfect environment and lighting to framing, composition, and editing, each step contributes to capturing the essence of your artwork. Remember to invest in the right equipment and experiment with different techniques.
Hope this was in some ways helpful to anyone to struggles when starting to taking photos of you work and can't quite get it right. Happens to us all!
You can follow my own work on Instagram @ronanmcgeough
Add To List
Add a Wishlist
form to add wishlist here